
Enjoy!
Lori
3T's with Allison Cope
Allison Cope is back again with us this week to share an inexpensive project with you that uses stuff you already have at home. Here is Allison's project tutorial:
Your Supply List:

- toilet tissue
- water
- paper towels
- rubber or acrylic stamps

Fold 4-5 pieces of toilet tissue on the scored lines to create a square of tissue. If you use single ply tissue, add a few more squares.

Take your folded squares and run them under the tap. Moisten the tissue but don't completely soak it. Ring out the paper to get rid of the excess water.

Flatten your wet tissue out to its square, flat shape again. Lay the wet tissue over top of your stamp.

Using your finger tips, lightly press the wet tissue into all the details of your stamp.

OPTIONAL: CAREFULLY tear the edges of your wet tissue for a torn look. Be careful not to tear too closely to your raised image.

Using your paper towels, LIGHTLY and CAREFULLY press on the wet tissue to absorb any excess water in your paper.

Carefully remove your embossed wet tissue from your stamp. I placed mine on a piece of paper towel on a cookie cooling rack. Let it dry! Repeat steps as desired for any of your stamps! Make plenty because you'll need to experiment!
Here is what they look like dry.... they are crisp, white and opaque.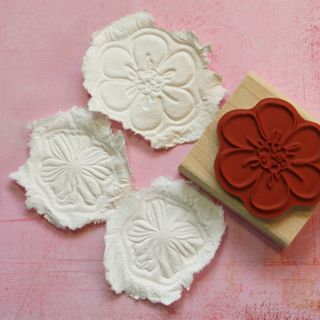
Now create some thing with your paper cast image!!!!

Just a Little Hello
by Allison Cope
supplies: cardstock: Bazzill; patterned papers: BasicGrey, Prima Marketing; stamp: myStamp BOX; jute string & ink;gems: Heidi Swapp; butterlfy punch: Martha Stewart; other: ribbon, button, thread. Stampin' Up!;
Your Supply List:
- toilet tissue
- water
- paper towels
- rubber or acrylic stamps
Step One:
Grab your supplies.
Grab your supplies.
Step Two:
Fold 4-5 pieces of toilet tissue on the scored lines to create a square of tissue. If you use single ply tissue, add a few more squares.
Step Three:
Take your folded squares and run them under the tap. Moisten the tissue but don't completely soak it. Ring out the paper to get rid of the excess water.
Step Four:
Flatten your wet tissue out to its square, flat shape again. Lay the wet tissue over top of your stamp.
Step Five:
Using your finger tips, lightly press the wet tissue into all the details of your stamp.
Step Six:
OPTIONAL: CAREFULLY tear the edges of your wet tissue for a torn look. Be careful not to tear too closely to your raised image.
Step Seven:
Using your paper towels, LIGHTLY and CAREFULLY press on the wet tissue to absorb any excess water in your paper.
Step Eight:
Carefully remove your embossed wet tissue from your stamp. I placed mine on a piece of paper towel on a cookie cooling rack. Let it dry! Repeat steps as desired for any of your stamps! Make plenty because you'll need to experiment!
Here is what they look like dry.... they are crisp, white and opaque.
Now create some thing with your paper cast image!!!!
You can also alter them too....
- colour them with markers
- paint them
- spray them with coloured mists
- add glitter or bling
- distress them
- ink them
- experiment.... that's the fun part!
- colour them with markers
- paint them
- spray them with coloured mists
- add glitter or bling
- distress them
- ink them
- experiment.... that's the fun part!
Here's what I made using one of my paper posies.... I rubbed mine with a little sponge applicator with some distress inks on it.
Just a Little Hello
by Allison Cope
supplies: cardstock: Bazzill; patterned papers: BasicGrey, Prima Marketing; stamp: myStamp BOX; jute string & ink;gems: Heidi Swapp; butterlfy punch: Martha Stewart; other: ribbon, button, thread. Stampin' Up!;


22 comments:
I love your idea and will be cranking them out right away. I tried a similar trick
with a three dimensional twist. taking 4 sheets of tp and spray misting them,
I pushed it into a candy mold and let dry. They are also adorable.
t
This looks amazing thank you for having this simple but really affective idea to bring more texture on to cards or home decor thank you again.
That is a fun technique. I will never look at toilet paper the same way. Can't wait to try it.
Just learning and need all the help I can get. Thank you for a great idea. - Linda K
This can also be done with decorative napkins. The designs also make them unique. I have always added a little glue to my water.
Very cool idea!
💖👍
Love your idea! Tks!
I love this technique!
As soon as I read your post...I tried it. It's still wet but it looks great! I'm anxious to try it on a card!!! I will definitly try it with my other stamps. Thank you so much for posting this terrific idea!
Love the idea. Tried it. Fabulous!
Thank you for posting.
Ive done similar with cookie presses but soaking paper towels and tearing them up and then with extra water put in the blende making a pulp out of it then squeezing out the excess water by putting in a strainer- :: important to line the strainer with gauze or fine mesh or a mess will ensue. Then press into the image and press all onto paper towels to flatten back/bottom. Then to dry you can microwave the wet paper. You can also tear and soak newspaper but is lots of messy ink, or just use new print plain paper. The pulp paper can be made thicker. Use ink pads to color or markers or spray paint light layers at a time.
I can see some ornies for the Christmas tree comming at my house using this technique.
You can also run your damp sheets of t.p.through the Cuttlebug in an embossing folder of your choice. It squeezes out the excess water. Then gently tear around all the edges to the size you want.
Love your idea, must have a go at this. As the saying goes learn something ever day
Wonderful idea! I wonder. What would happen if I attach this to a finished paper mache project - like a jar or a vase - as an added texture? Will try and let you know.
Did you know this technique has been around 20-25 years? I think after each layer dried we put embossing powder on and then heated it.
I used the water, mixed with a little glue. Used the back of a depression glass dish which had a medallion design on it. Allowed it to dry on the dish, and had a very stiff medallion which I cut and used as a framed centerpiece for a card.
I'd like to see your example Anonomous!
This is a fabulous idea! Thank you for sharing! I can’t wait to make some embossed stamps from TP!
This is wonderful to know. I can certainly afd this to my crafting. Thank you so much.
Good suggestion. Thanks for sharing
Post a Comment