

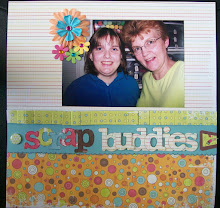
I've been so busy finishing up swaps and scrapping projects--this being one of them. This is called a "Pinecone Ornament" because of the way it looks once it's completed. It's very simple to make really---it's just time consuming. This makes a wonderful gift for a teacher, friend, neighbor, etc! Here are the directions. Enjoy!
Pinecone Ornament
Materials Needed:
2 or 3 inch styrofoam egg
1 sheet 12x12 patterned paper
Ribbon
Dressmaker Pins (aka lace or bridal pins) *I call them "common pins".
Glue Gun
Optional: Springs of holly, pine, berries
Start by cutting your pattern paper into 1 inch strips. Next, trim the strips into 1 inch pieces. You will use most, if not all, of the 12x12 sheet of patterned paper, depending on how tight you layer your pieces. Next take your 1 inch pieces and fold in two corners to the center to create a point. The opposite end of the 1" square is left straight. Do this to all the squares before applying to the egg.
Now you're ready to start placing the pieces onto the styrofoam egg. You want to start at the narrow end of the egg. Place two trianges with the tips touching (one opposite the other) and pin each piece down using the dressmaker pins. You want to pin it along the straight edge opposite the point. Place two more pieces on either side of the first two, overlapping the edges. Keep layering the pieces, overlapping as you go around the egg. You want to make sure you're covering up the dressmaker pins as you layer each piece. Continue in rows until you reach the top of the egg.
Don't worry about the top pins showing They'll be covered with ribbon. Cut 2 pieces of ribbon 5 inches long and another one 8 inches long. Make small loops with the 5 inch pieces and hot glue to the top of the egg, covering the pins. Make a large loop with the 8 inch piece--this will be used to hang the ornament.
The following 2 photos show the top of my ornament and a closeup of the 'triangles'.


If you have any questions, email me!
I hope you have fun with this project.


15 comments:
Oh my word Lori this is absolutely incredible and stunning!!! I'm amazed! I HAVE to get myself an egg to make one of these for my tree. Thank you so much for your instructions it really is gorgeous! hugs, Jane xx
What a beautiful ornament! If I find the time, I might try to make one. Thanks for sharing with us. Also thanks for the blog award.
hugs, Karen Lee
Lori, I love love love my beautiful ornament! It is so detailed and precious. I am anxious to get your package to you. I hate waiting...lol
Anyway, your gift is graciously received and appreciated. I don't want to gush or anything...lol
Thank you is all I can say,
Sharon
Lori,
I posted about your lovely gift! Please stop by when you have time.
Sharon
This is so cute!! I'm going to try too if I have time.
Thanks for the tut!
*hugs*deb
This is so pretty! Thanks for sharing your instructions!
Hi Lori,
Here from Shardon Exclusives to see how you made the beautiful ornament! What a work of art! I'll have to try my hand at one. Love the black and white!
Many Blessings,
Linda
Hi Lori I will make the time to create some of these for friends, and one or two for my tree...thanks so much for sharing this tutorial....it does seem easy enough..ehehehe!!
hugs,
http://bevie2u2.blogspot.com
I saw this over on Sharon's blog...It's such a beautiful ornament! I've never seen anything quite like it. Great work! ~Lori
Hi Lori, I love this pine cone ornament, and maybe I can get around to making before Christmas.
I am in on the ECS ornament swap.
I love the swaps...always lots of fun. Thanks for the pattern.
Smiles and Blessings,
Nancy C
Hi there,
Thanks for your interest in participating in Reader's Tutorial Week. I would love to include this lovely project! Please email me at craftaholic@rocketmail (dot) com so that I can give you more details. I tried to email you, but your email is not linked to your blogger account...
Thanks,
Linda
Craftaholics Anonymous
I will need to hear from you by December 5 so that I can give you the details if you still want to be part of Reader's Tutorial Week. If I do not hear from you by then, I will give your spot to another blogger.
Hope to hear from you soon. Thanks!!
Linda
craftaholic@rocketmail (dot) com
so cute and clever!
I'm just a tad overdue but I am so so glad I came upon this!
Simply elegant❣️
Thank you
Absolutely beautiful! I wish though instead so many completed pictures you had thrown in a couple photos of the folding part. I don’t think I can make it because I’m not sure of the folds. Really lovely though
Post a Comment