

Here are the materials you will need:

Plastic CD case (make sure it has a 1/4" spine--some CD cases are extremely thin)
Clear Dots adhesive (Zots)
Bone Folder
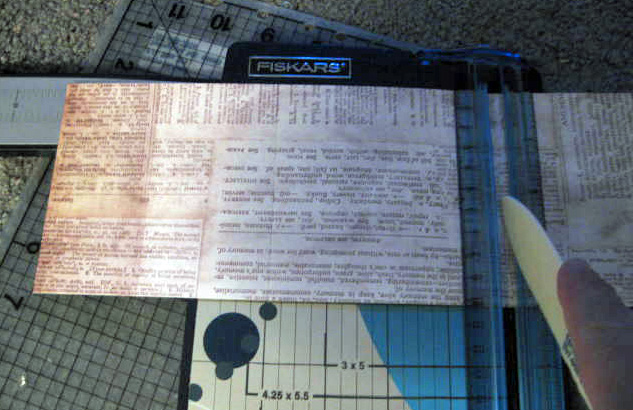
Trimmer
Double sided designer paper-- 2 sheets of 12x12
Circle Punch (I chose not to use)
Cut all your papers to the following sizes:
Front Cover: 4 7/8" x 4 3/4"
Back Cover: 6" x 4 5/8"---score in from each short side 1/4"
Inside Pages: contrasting paper measuring 4" x 12"--you'll need strips.
Mat piece (for back cover): 4 1/4" x 4 1/4"


Gift Card Holder (goes on inside of front cover)
Front piece: 1" x 4 3/4" -- Back piece: 3" x 3 5/8"

Steps:
1. Remove the plastic piece that holds the CD (this can be tricky, but it's not hard. Be careful not to crack the spine)

2. Adhere the front piece (4 7/8" x 4 3/4") to inside of the front cover using clear dots. (Place the dots in each corner)

3. Adhere the back piece (above) to the inside of the back cover. Add small clear dots to side tabs so they will stick to the spine and the right edge of the case. Recrease with a bone folder. Trim any excess or the cover will not close properly. Set case aside
4. Score the 2 4 x12" strips at 4" and 8"

5. Fold the 2 4 x12" strips pieces at the score lines (4" and 8")

6. Attach one end of the strip to end of the other strip by overlapping to create a long accordion strip.

7. Fold into a booklet and re-crease at the folds.
8. Adhere the mat (4 1/4" square) to the inside of the back cover:

9. Attach the accordion strip to the mat---make sure the bottom part of your album is attached to the mat and that the top accordion fold is to the left (top page)

10. Create a pull tab (using circle punch--optional) by making 2 circles or 2 squares (as I did). Adhere half of the tab to the center of the top page, making sure that it doesn't overlap the plastic edge (or it won't close). Match up the 2nd tab and glue to the tab on opposite side. Sorry if this sounds confusing!


11. How to make the Gift Card Holder for the inside of the front cover: Score the back piece (the shorter piece) 1/2" along one long side and fold up to create a flap.

12. Score the front piece of the gift card (2" x 4 3/4"), 1/2" from each side:

13. With the flap facing up, adhere the bottom of the shorter piece (2" x 4 3/4") to the flap. Turn over and adhere the side flaps to the back:

14. Adhere to the inside of the front cover:


Here's the finished product:

Enjoy! If you have any questions, please ask! Thanks.
Wishing you a wonderful day.


1 comment:
very cool, one of the scrapbook diva's was asking about the cd case book. I came over to check the dimensions again for the matchbook, I am making another!
Have a wonderful end of October, Lisa
Post a Comment