WARNING! This is a very. long. post! If you just want to scroll through and not read all the captions, feel free. I tend to post a lot of pics when I participate in this blog hop.
Most of my room, which is located in the basement, is pretty much the same as it has been for the last two years. I had great intentions of changing it up a bit the past year, but unfortunately, life threw me a few curveballs and I never had the opportunity to do some of the projects I had planned. One of them was to paint the walls, another was to organize it a bit better than it is right now. Oh well. Since last year's party, I've been working full time, found out my daughter was pregnant, holidays, planned a baby shower, then my husband needing surgery, working 40 hours a week and babysitting for 20+ hours---ahhhh, the list goes on.
Most of the items you'll see in my room are thrift finds from flea markets, yard sales and thrift stores. My room is not the prettiest, nor the most glamorous, or the most 'all-together' room where everything matches, but it is functional. I live in a small ranch and I was very fortunate to have the space I have. Hubby built shelving units to create a 'wall' separating my space from the rest of the basement. He also hung white sheets over the ceiling to give me more light and to 'dress it up a bit'.
Throughout the room, I've added touches of 'me', so to speak. There are birdhouses, paper crafts, swap items I've received, mementos, a few items from my childhood--things that make my space feel special. I've wanted to add items to make it look whimsy and colorful, but I'm still working on that. I also covered the fronts of all my storage containers so it looked a bit 'cleaner' and better organized. Most of the drawers are labeled. That's also another work in progress.
So....without further adieu, here's my room:


 |
| As you can see, I've used the bottom of the table for storing my other craft supplies, most of it paints and painting supplies which, unfortunately, I rarely use. |
 |
| Another view of the room, showing the right side. The white garland was leftover from my daughter's wedding. She was going to throw it away, but I wanted to hang it in my room. |
 |
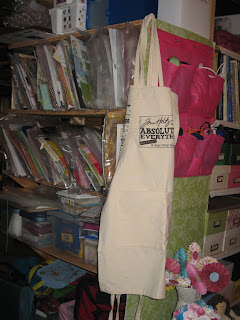
| Here's the view standing at that small table mentioned above (apron, pocket organizer) |


This green wooden 'thingy', purchased at a yard sale, holds some of my stamps, the ones I use most often. I have other stamps in boxes. The other photo shows my placard I use when making YouTube videos (which has been a long time as well.)
 |
| This is the view on the back wall behind my table. |


Here is a close up of the clip-it-up. This photos shows a close up of what is displayed on top of the wooden jewelry box--another yard sale find. Above the table is my 'mood board" (which I need to update):
 |
| The mood board which displays tags, cards, embellies, anything that strikes my fancy at the moment. Most of these items were from swaps as well. |


To the left of the back table is another book case (another yard sale find), which holds photo CD albums; button jars; bead jars, baskets and boxes holding an assortment of other things, that to tell you the truth--I can't remember! Geez, I've got to look through them again. To the left of the book case are two items purchased at thrift stores--a tiny brown wooden shelving unit displaying my favorite stamps, and on top of that sits a mini cabinet displaying my tiny teddy bears (I used to collect them). In front of that is a wooden 'birdhouse', again, bought at a yard sale. Next to the book case is a wooden rack that was once used for hanging clothes, I think--not sure. Anyway, I just recently decided to use it for storing my small collection of Washi tapes. The sign "Scrap Room" was made by me several years ago for my old scrap room in the other house.


The above four photos ---a side view of my Washi tapes; to the left of the narrow white book case begins my "wall". The photo in the upper right is another white book case (from my daughter's room) that holds all the small Sterilite containers which fit perfectly! These are labeled with the types of embellies in each box. The bottom left photo shows my Sterilite units stacked one on top of the other to create part of the wall of my room. Each box is covered in paper and labeled with the contents. The bottom right photo is the wooden unit between the stacks of Sterilite containers and the white bookcase (upper right). My husband basically built the 'wall' around the containers--LOL!


The left photo is the lower half of the 'wall' The bottom Iris containers hold layouts yet to be completed and other projects. The photo on the right is my table which is 8 feet long. I wanted to cover up what's hiding underneath, so I found some fabric that I had hoarded for the last 25 years (yes, that long!) and made a continuous skirt by hot gluing (no sew) the panels together and then gathering them on the top using glue as well. I then attached the skirt to the table using velcro dots and covered the raw edge with fabric ribbon. The chair is covered in an old sheet with a piece of fabric over the back and a seat cushion covered in some left over fabric as well. When I was doing this, I wanted to add color and some 'shabbiness' to the room. Not sure if I succeeded.


Here's a close up of the chair (wanted to hide the black) and the next photo is taken from the corner where the two brown 'towers' stand. Now, let's see what I have on my desk:


Sitting on top of yet another yard sale find--a white two level shelving unit, is this wire item of which I don't know what it's called. I only know that it spins. This holds my Ranger ink pads, alcohol inks and chalk paint. The other picture shows the other side of the top of the unit. This is actually a 'necklace hanger" but I used it for holding my vintage embellies.
 |
| Here's a better picture of the shelf. The assorted baskets hold all kinds of assorted tools and items I'll need when working on my projects. |


To the left on the table is an old wooden bed tray (another thrift store item) which holds two antique sewing baskets full of trims; teacup pin cushions I've received from swaps and an altered cigar box. Beneath the bed tray I have terra cotta pots holding paintbrushes. In front of the bed tray is a wooden lazy susan holding altered tin cans which store my colored pencils, pens, scissors, rulers and a host of other tools. Beside the lazy susan is my troll which I've had since I was 9 or 10. Next to him is a ceramic 'purse' which olds markers then there are two other tin containers (dollar store) holding more tools and colored markers.
 |
| This is the brown book case to the right of my table. It is a mess! This holds a ton of unfinished projects my daughter and I have. So, so many! |
 |
| Here's the backside of the Lazy Susan--these are altered salt shakers from a swap last year. |

















28 comments:
You've made good use of your space in the basement and I like the personal touches. I could probably organize my little basement studio better and although I'm repurposing most of what I have, do like Ikea storage some of the gals have shared.
Happy Crafting from # 33.
You have taken a basement and made it your own crafting domain. I also covered my chair with a sheet. :-)
Happy Crafting ~ FlowerLady
I think your space is wonderful! You have so much room and tons of storage. Yay for creative minds behind creative spaces!
You have an amazing amount of storage space, Lori! That is so wonderful, basement or not!! So nice to visit and take the tour! Happy Creating, Cindy
Hi Lori,
It is just wonderful how every single space is so uniquely and wonderful different. I've had so much fun blog hopping and peeking into everyone's creative spaces. Thanks for sharing and thanks for stopping by my space and sweet comment.
Hugs,
❤️Ana
Hello Lori. What a wonderful size studio you have. heaps of storage containers and cabinets. You must have the largest paper collection in town, how wonderful. Thanks so much for the tour. Karen.x
Looks pretty organized to me!! Love your troll ~ I still have a couple of mine from long-ago. Thank you for the tour, and happy creating!!
WoW, look at all that storage! What a great basement studio, love what you done with it!
Thanks for sharing!
I have been going down the list and taking a peek into everyone creative spaces. I am so grateful to Karen for doing this. I see wonderful things in each space. Yours is simply great . . . If I had a basement, that is exactly the space I would choose. There is so much that you can do down there and you are away from the busy up stairs where chores are waiting. You have an amazing storage system, storage is something you just can not have too much of. Thank you so much for allowing us in to peek around.
Have a marvelous week.
Connie :)
Oh Lori. I love your space. Your so blessed to have such a huge space. You've done a fabulous job making it functional and pretty. I love your idea to cover the chair.
Why can't they make pretty chairs? I'd love to make min pretty. Thank you for joining the party and inviting us in. I loved the visit. Have a great week.
Wow, looks like you have the whole basement. That's awesome! You've done a great job organizing.
I love your space! You are super organized. The space is very cozy. I'd love to have a basement studio. Basements are exotic to me. (I live in Florida - we don't have basements). Thanks for sharing! :)
You have an amazing creative space, With lots of storage. Thanks for sharing Lisa xx
Amazing Space-- and I love the green wooden 'thingy' you have hanging on the wall. I would have bought that too. I am an obsessive thrifter, so half the stuff in my house is second hand. You have done a wonderful job with your basement space. It looks like you've utilized every square inch, and so adorably. I am lucky to have a big room now, but my previous space was in the corner of a basement. I still don't know how I had so much stuff crammed into that tiny space.
Thank you so much for the tour, and for visiting my blog, A Glitch in Time, and your lovely comment.
All the Best,
Gwen
What a great studio, a scrappers dream! I see so many tools I would like to try and papers I would like to play with in your basement space. Thank you for sharing.
Dont worry about posting too many photos Lori.. we love lots of photos!!! Your studio is definitely a paper crafters dream! What fun you must have in there! Thank you so much for joining the party and letting us all have a tour! I hope you are enjoying yourself!!
xo,
Karen
Your space is amazing! I am jealous of your paper racks! Thanks for sharing with us♥
You made amazing use of your space. I love the soft, pastel colors and the shabby chic look. It looks like a very creative space. You have so much stuff too! What a goldmine!
Lori..
I love your studio... so many lovely things to see and your amazing organization.. Ohh. lala..in those yummy colors! Thank you so much for sharing your marvelous space!!
Pamela
What a wonderful creative space so full of supplies to create with. You have everything so well organized and love the space.
Teresa
www.foxhollowstudio.com
I realize I'm late visiting, but I couldn't miss this opportunity to see your beautiful space. And beautiful it is. Functional, too. I love how you have stored your washi tapes. I don't have enough of those to dedicate an area, but I sure like what you did. I can tell you LOVE to scrap with all the paper, the books, etc.
So glad I got to visit. Thanks for sharing your lovely craft space with us.
Life happens and sometimes we don't have the exact space that we want, but your space is so organized and filled with inspiration. Love your creative space... Thanks for stopping by and seeing my little creative studio. Many blessings...
I remember your space, Lori, and I remember thinking if I had a day to spend in your creative space what a ball I would have! I could probably spend half a day just looking at all your supplies. How great that you have such a nice big area to spread out in, yet you keep it well organized. Thanks for sharing your space!
Lovely workspace! It looks really organized, I like all your shelves and storage. Your covered chair is cute, too.
Thanks for swinging by my space and commenting. :D
Thank you for visiting my studio and for your nice comments. I love the way you have repurposed so many pieces of furniture to fit your space and make a great place to create. Thanks for the tour!
WOWZA! I think you win the prize for the most organized space that I have ever seen!! I am blown away!! I will need to come back and jot down some notes so I can learn from you!!Totally love it and so envious of the amount of storage you have and the size of your space!! Thanks so much for the inspiration!!
Hugs,
Deb
I enjoyed reading you post. You have a lovely workplace. I love how things are organized.
Love your space! I think the sheets on the ceiling are brilliant!
Post a Comment