
Materials Needed:
* Photo with a light background
* Designer Paper cut to the size of your copied photo
* UTEE (Ultra Thick Embossing Enamel)
* Glue Stick (it has to be a glue stick as any other type of adhesive will not work)
* Versamark ink
* Heat Gun

1. Copy your photo onto ordinary copy paper (the kind you use with your computer printer). Cut the copied photo from the paper.


4. Attach the copied photo to the top of the Designer Paper. The pattern of the designer paper should be facing up. Trim excess paper from around the photo.

5. Apply Versamark Ink to the entire surface of the photo. Check to make sure you don't have any 'dry' spots. You might have to tilt it to see where you might've missed.

6. Immediately cover the surface with UTEE and shake off the excess onto a paper towel or scrap of paper. Set the paper/paper towel to the side or pour it back in the bottle.

7. Next, place the photo in a pan (I used an old baking pan). This helps keep the photo in place so the photo doesn't 'fly' around while heating.

8. Apply heat to the photo using a heat gun specifically made for embossing. DO NOT use a hairdryer! If you're unsure of how to heat emboss, please read the manufacturer's instructions. Just hold the heat gun a few inches from the surface and move it around your surface as the UTEE melts.

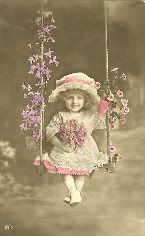
9. Repeat steps 6-8 two to four times. You should start to see the image of the designer paper showing through the photo. In my photo, the vintage writing can be seen through the white of the jacket and of the bridal gown. NOTE: I had to do this project over using a different photo:


I hope you enjoyed this tutorial. Share any comments you might have!


5 comments:
omg That is super cool!! gorgeous photo too!! :)
Oh wow, how interesting! You could even make that into a card....cool card for their anniversary! Thank you for the tutorial. My parents celebrated 66 years on Monday! Hugz to ya!
Super cool! Thanks for sharing, I will definitely give it a try :) And congrats to your parents!!
Very cool technique! Great step by step photos and instructions! They are very easy to follow and understand. Thank you for sharing :)
Yes,I have tried this great technique with beach pictures. I love the effect. Great tip about the glue. I must not have put on enough as they are curling a peeling quite a bit. I never posted it as I have a shadowbox adventure to go on with them. Stay tuned. Lisa
Post a Comment