I'm linking up with Jen@ Tatertots and Jello who is one of the featured holiday blogs over at Simply Sweet Home who is hosting the "Holly Bloggy Christmas Bash" and The Girl Creative's "Creating Christmas Blog Fest". Whew! did you get all that!?
Today, all you have to do is share an idea you may have for Homemade gifts over at Tatertots and Jello. She's having some giveaways as well. To participate for the entire week, click on the party widget "Holly Bloggy Christmas Bash" to the right of my sidebar. There are also some great giveaways as well at Simply Sweet Home. Please stop by Jen's blog and offer your idea. Also, at The Girl Creative--Day Four is all about CREATIVE GIFT WRAPPING and the idea I'm presenting is perfect for this!
I am a scrapper and paper artist and so most of my gifts are paper-related. This is perfect using Christmas themed paper and then hiding a small gift in each 'drawer'. Enjoy!
MAGIC BOX:

I found this tutorial at Life as Lou blog about 9:00 last night and thought: "Hey, I can do that!". It's not that difficult, either. I used the Blossoms and Butterflies stack (DCWV) and followed the directions on her blog. It probably took about 1 1/2 hours to make--not too bad. I'm sure as I make more, it won't take so long. She also has a great tutorial on Explosion Boxes. I have made those in the past and they make beautiful gifts. Her blog is wonderful! Hop on over and check it out. Here's the LINK If you make one, let me know-I'd love to see it!
Below is what the box looks like opened up. There are four 'drawers'(my word) to store goodies.
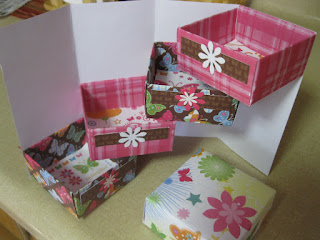
Looking down to see the inside of the boxes. I cut a 2 3/4" square (which is not mentioned in the directions) to dress it up a bit. Leah (Life as Lou) did the same in her examples.

Oh, the only thing I would've done different was to use a two-sided sheet for the outside of the box. This was a 'learning' experience. Also, the purpose of the ribbon is to help keep the box closed. When the box is closed, there is an open 'seam' that is somewhat noticeable if it's not tied closed with a ribbon.
This was such a FUN project! Have a great day! Thanks for stopping by my blog.













10 comments:
Thanks for the tips - these are great!
Very cute! I save cereal boxes and the like and use scrap paper or gift wrapping to decorate them as gift totes. I can't even count how many I have made so far that are just waiting for gifts to be placed inside for giving. Best wishes, Tammy
This is just much fun!!! I just love how it opens out!
That is so adorable! I know a little girl who would love to open up a box like that filled with goodies on Christmas morning! Great idea!
This is great! I have to make one.
Those little boxes are adorable! How cute!
Thanks for linking up!
XOXO
Jen
love this idea TFS :D
great idea! Looks pretty simple!
Just thought I would say Hi
came by to see the magic box and thought it was so cute... a lot of work too (o:
Wow this came out so beautifully! Thanks for the little tips. I've been wanting to make one of these for ages but never seem to have the time. Now with winter coming and not being able to get out as much, cause it'll be too darn cold I will have to finally give it a try. I love being able to make things just out of paper. I'll look into that tutorial for the exploding box too, I've made a few with one set of directions but I can't get things to come out quite right. I wonder if someone else will be give better directions. Mine end up with slight gaps. If you like templates have you tried any at http://www.papertreyink.com/timeless_templates_download_here.html? A lot of bloggers seem to like them. I just downloaded the free ones to try out.
Post a Comment