Showing posts with label paper flower. Show all posts

Sunday, May 19, 2013

Let's Catch Up--Shall We?

Hello bloggers:

I've been soooo busy!  The weather is getting milder and I'm loving it.  I'm outside as much as I can so my scrapping has been put to the side.   I can't believe that's it's been two weeks since I last posted so I'll do my best to catch you up on what I've been up to.  

First of all, I've been making samples of flowers for the bouquets for my daughter's wedding.  She's getting married August 17th so I want five bouquets done by the end of July.  I also have to make 7 boutonnaires.   Of course, with a wedding comes a bridal shower and my other daughter, who's the maid of honor, and I have been busy planning that as well.  I'm having a lot of fun with it too.  The shower is set for June 23rd and we're planning on a garden theme.   We'll have a tent set up outside by the pond that her future in-laws have in their back yard and I'll have paper lanterns hanging along with some whimsical flowers and butterflies.  It's going to be pretty.  I just can't wait!

I've also just finished up some swaps:  The "Green with Envy" Junk Journal swap over at Mini Album Scraps and the "Kitschy Flower Kit" swap over at Your Paper Pantry.   My partner for the junk journals was Evelyn Robinson.  I'll be doing a video of the journal she sent me tomorrow and will post on Youtube over the weekend.   Here's a picture of the one I sent to her.  


The theme for the Green with Envy Junk Journal swap was obviously green with some accent colors, but I wanted the journal to be about 80 percent green.  The other requirement was that about 50% of the pages had to be envelopes.  From what I've heard, all the swappers were very pleased with their journals they received.  I know I love mine!

The flower swap over at Your Paper Pantry was a lot of fun too.  We had to put together all kinds of items that we could use to make flowers and we could include handmade and store bought flowers as well.  I loved this swap! Here's a sampling of what I sent to Cari:


I also sent along assorted fabrics, doilies, printed napkins, etc.   If you want to see more, you can go to my YouTube channel and watch the video.  Click here: http://www.youtube.com/watch?v=w22Awy8UPUs    I tried uploading it, but it didn't work.

I also want to share what I bought at the Creating Keepsakes Convention that my daughter and I attended in April in Manchester, NH.  As always, I spent more than my budget allowed.  I just couldn't help it!   I think I'm going to do a separate post for that one.

As I mentioned in the beginning of the post, I've also been making paper flower bouquets for my daughter's wedding.  This is what I've come up with so far:


Sorry about the quality.  I was using my newer camera and I'm still trying to get the 'kinks' out of it.  

Well.....I think that's about it.   I hope you'll stop by soon and check out my purchases at CKC!

Have a wonderful day my blogger friends.

Sunday, September 9, 2012

More Coffee Filter Roses to share...

This past week, I've been practicing making different roses from coffee filters using different techniques and trying to come up with my own version from the roses I've found on line.   I've been using ideas from these ladies on YouTube:

Martha Stewart
MommyMakesRoses.com
JenMarissa--Mommy Blog
Sewcrafty1-- 
Cassie Viola
CookingandCrafting
Kativilaga (english subtitles)

There are so many more videos, but I was looking for ones using coffee filters specifically.  I love the texture and how delicate the roses look when done.   Here are a few pictures of what I've done so far:


I have a few more months to practice then I need to get started on the final bouquets.  I have to make 5 boutonnaires--4 bridesmaids bouquets---the bridal bouquet and 2 mother's corsages.   No problem!   

Thanks for looking and have a wonderful day!

Sunday, September 2, 2012

I Made My First Coffee Filter Rose

I'm not sure how I like them.  They're alot better than the first one I made, but there's definitely room for improvement.  Remember the post found here:
 http://www.scrapmomsmusings.blogspot.com/2012/08/im-baaack.html#links .  Well, mine don't look that beautiful, but I'm still practicing!  

Here's what mine look like.  The white rose is before coloring it with watered down acrylic paint.

Below is the rose finished and colored with acrylic paint.  There is one problem though.
Once the flower was created (see the white one above), I dunked the flower in the paint solution and let it dry until it was damp---which took about 4 hours (maybe more).   I used an ordinary blow-dryer to hurry the drying process and it worked fine.  I did this because it's how the presenters in the other videos did it.    Once the rose was completely dry, and I was separating the petals, I noticed the splotches.  It's the acrylic paint that didn't dissolve in the water!  It's not toooo bad, but it's not perfect either.  Oh well---back to the drawing board!

Here are more photos:

 In my next experiment, I'm going to dye the coffee filters first, then cut out the petals.  I might try wetting the filters, then adding water color pencils to the edges and see what that does.  Hey, I have 11 months to get 5 bouquets done.  Do you think that'll be enough time?   My husband thinks I'm crazy to put this on my shoulders, but I love my daughter and I want her to have what she wants for flowers for her wedding.  

Wish me luck!
Lori

Monday, February 14, 2011

Welcome to Day 6 of the "Be My Valentine" Blog Hop

Hello and welcome to the 6th day of the CSD Be My Valentine Blog Hop.  Actually, it's Day 7, but I'm a day late in posting my project.  I will be doing Day 7 as well in  a separate post.  

All week, the Design Team and members of Creative Scrapbooking Divas have been sharing projects to inspire others to create something for their loved ones (or for themselves!).  If you've just come here, not realizing there was a blog hop, please start at SANDY'S Blog.  The main page of Creative Scrapbooking Divas will have the full list of DT's and members in the blog hop.  If you haven't hopped yet, you should, as there are some great projects for Valentine's Day. 

You will have until February 17th to upload your projects to my blog hop thread found HERE.  I have posted examples of all 7 projects.  I will draw a name via random.org for anyone who posts their project(s) in my blog hop thread by February 22nd.  The winner will be notified on February 23rd.  I have a nice little package of scrapping goodies for the lucky winner. 

Now that the 'formalities' are done, let's get on with my project.  Today I made a very simple accent/embellishment that can be used on cards, layouts and altered projects.  Do you remember making tissue flowers as a child?  I do.  It was one of my favorite things to do with my friends.  This is the same process but on a smaller scale.

You will need scissors, one twist tie and an assortment of tissue paper.  You can use one color, but it looks better with 3 different colors. 
Cut your tissue paper into squares (whatever size you prefer).  I did mine in 3" squares.  Then stack them.  I did dark, light, dark, light and added one white square on top (the center of the flower).
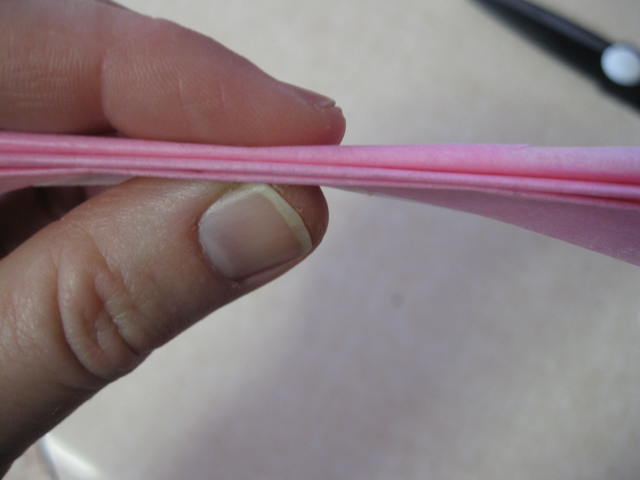
Next, fold these into an accordian. 
Wrap the twist tie around the center of the folded tissue paper:
Next, trim the edges into a curved shape:
Very gently, fan out the folds on each side of the twist tie:

The next step, you need to be real gentle as the slightest pull too hard will rip the tissue paper (it happened to me).  Pull each layer towards the twist tie on one side, then repeat on the other.  This is what it should look like:

Play around with the flower to get the shape you want.  I just manipulated it (gently) until it resembled a flower.  You might have to 'squish' it around the bottom as well.

I wanted to add some 'extra' to this to make it look like a real flower, so I cut some leaves from scrap paper and also cut a circle (1") for a base.  Glue the leaves to the base:
Add a dollop of glue to the center and set the flower on top.  Again, be gentle, yet press down to get it to stick.  Use strong wet adhesive.
Note:  If you want to add lace, tulle, or fabric to this for more dimension, glue it before adding the flower as I did above.  This is the final look of the flower:

I hope you'll make some!  These look great on layouts, mini albums, altered projects, tags, gift bags, etc.  You can make these any size you want and you can make them from napkins as well.  I even used dryer sheets!

Thanks for stopping by and have a great day!  Please come back for Day 7's project.